with colleagues, laugh hard until finally cried aloud as many as 10 times "THIS IS VERY EASY"
After various complications in the wireless, it's time we change the
server, use proxy jaylangkung.com side to management
bandwidth and router.
Here will be discussed from the speedy bandwidth management, so the ADSL modem
RJ45 cable down and into the LAN computer that has been installed
mikrotik
First time to be on a computer server set up is minimal with
specifications :
1.Processor PII
2.Memory 128
3.NIC (Lancard) 2 pieces
4.Hardisk minimum 1 GB
5.CD room
Step 1 :
Start download Mikrotik, download the ISO here : www.mikrotik.co.id/download.php (click mikrotik-4.2.iso)
Step 2 :
Then burn the CD, burning Image
Step 3 :
After that, insert the CD that had been loaded into the proxy server computer
then turn on the computer.
Step 4 :
Wait until the computer appears as below :

Step 5 :
After that press the 'a' (without quotes) to install all the facilities
contained in mikrotik
Step 6 :
Let it go, because the installation is in progress, starting from
formatting disks until the installation is complete, if the display appears as in
following the installation has finished.

Step 7 :
After the process is complete, download mikrotik is innate tool, (Winbox) can in
download here : http://www.mikrotik.co.id/getfile.php?nf=winbox-2.2.11.exe
Step 8 :
After that plug the cable from the ADSL modem to one computer Lancard
which has been installed mikrotik
Step 9 :
Then the second LanCard to a HUB / Switch to the local network.
Step 10 :
Installation has been completed, now the remote server computers that have been in
installation on top with Winbox which we downloaded, by using
Other computer

Step 11 :
Select a router that we had installed, its default identity mikrotik, username
admin, password blank

Step 12 :
Select the menu interface, if it has run correctly, it will appear 2
fruit Lancard interface.
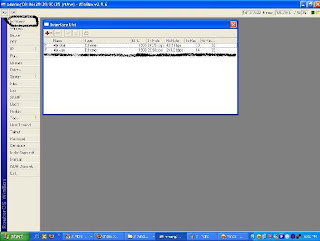
Step 13 :
Double Click on one interface that refers to the local and name Local
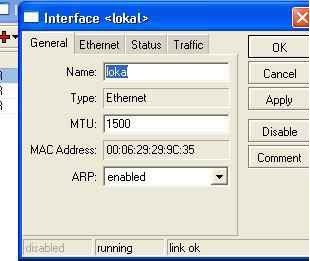
Step 14 :
In the same way, which refer to Interface naming modem Public
Step 15 :
After that, select the menu IP address
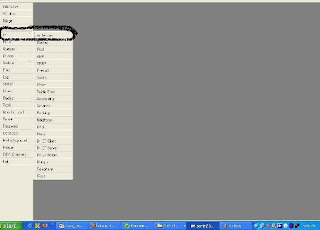
Step 16 :
Display appears as below, then press the plus + button in the left corner
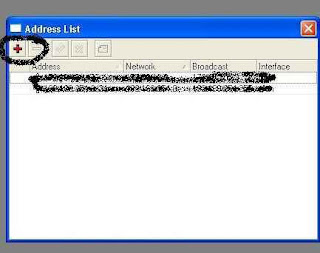
Step 17 :
Add addressnya Ip, for example:
Speedy Modem IP 192.168.1.1, then the proxy IP: 192.168.1.2/24
and named
then press the plus + button in the left corner, then add the IP
address other Lancard
eg local Ip at 10.10.10.1, then enter the IP address
10.10.10.1/27, numbers / 27 to 30 host IP,
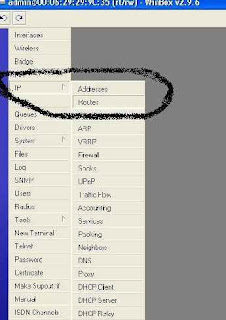
Step 18 :
After that select IP and then select the sub menu Routes
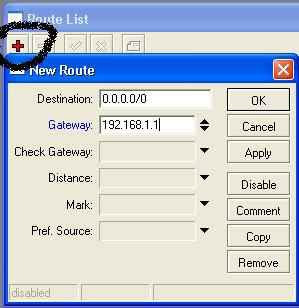
Step 19 :
Then enter its IP gateway, by pressing the plus + in
her left hand corner of the Modem IP 192.168.1.1, then press the OK button
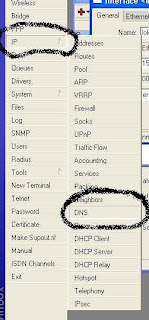
Step 20 :
After all the above steps completed, the next step is to fill the control
menu by IP> DNS
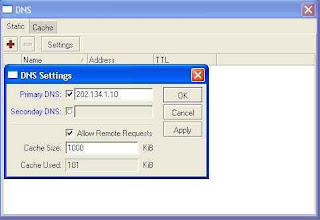
Step 21 :
Select Settings and enter the IP dns, with the primary DNS 202.134.1.10
(default speedy) are both secondary DNS 202.134.0.155 (DNS speedy)
Step 22 :
Once completed the final stage you have to do, which makes the rule for
can be used locally. This very important stage, where communication
LanCard 1 with LanCard 2 placed here. The essence of the above settings on
this stage, it should not be confused
Step 23 :
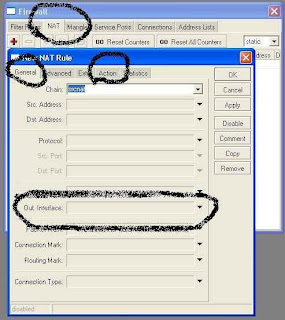
Choose IP> Firewall> NAT> General
Step 24 :
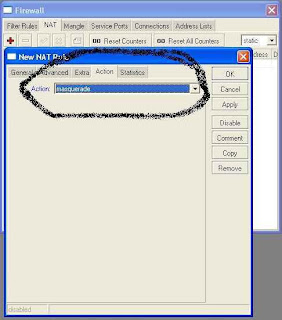
Chain = srcnat, Out interface = Public (interface we have been given
public name) and then select the action = masquerade and press the OK button
to end
Step 25 :
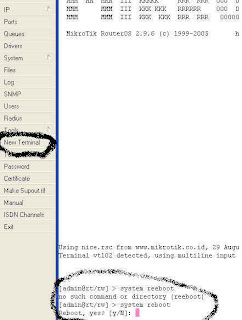
do restart the router by pressing the New Terminal, and then
script type system reboot, and the sign of Y
Step 26 :
When finished restart doing ping checks in a way, in the New
terminal at the gateway 192.168.1.1 ping, ping the DNS 202.134.1.10, if
occurs replay means the router is OK
[admin@rt/rw_2] > ping 202.134.1.10
202.134.1.10 64 byte ping: ttl=60 time=60 ms
202.134.1.10 64 byte ping: ttl=60 time=62 ms
202.134.1.10 64 byte ping: ttl=60 time=80 ms
202.134.1.10 64 byte ping: ttl=60 time=77 ms
202.134.1.10 64 byte ping: ttl=60 time=77 ms
8 packets transmitted, 8 packets received, 0% packet loss
round-trip min/avg/max = 60/73.5/80 ms
[admin@rt/rw_2] >
Step 27 :
If there Request Time Out, then you review on your router or
on LanCard you, or on your modem, or on your connection
Step 28 :
Now the installation can be completed in say, just forward IP to all
client starts from 10.10.10.2 to 10.10.10.30 onwards because
subnet that we make this 30 hosts
If you have any questions or you do not understand, please comment here
^^
1 comments:
Very informative post. Keep up the good work. I would really look forward to your other posts
Dell - Refurbished - 13" Latitude Notebook - 2 GB Memory - 320 GB Hard Drive
Dell - Refurbished - 13" Latitude Notebook - 4 GB Memory - 320 GB Hard Drive (E4310)
Post a Comment